Pingg-String End Post Kit
30-day money-back guarantee
Express shipping available
Includes Internal Links to Make Wiring Simple
End Posts that tension & connect the Pingg-String wires
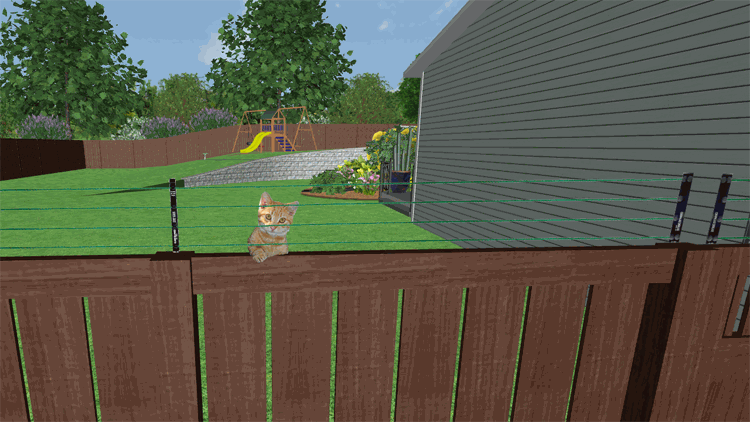
The “Fence-Top Barrier” consists of four wires that are tensioned by these End Posts and held apart by Support Brackets. The End Posts are a special copyrighted design incorporating unique electrical wiring links that form part of the barrier. The fence barrier is designed for existing fences 1.5m or higher. Once installed, it sits a maximum of 18cm above your existing fence. The barrier stops cats and possums going over the fence or possums travelling along the fence.
We recommend that you install the Pingg-String Fence Barrier along the full perimeter of your protected area. Do not leave any gaps that animals could exploit.
The Pingg-String Ground Barrier is powered by the Pingg-String Solar Energiser (sold separately).
Get Your Customised Fence Quotation:
Image Gallery
Contents
Each End Post kit contains:
- Four (4) End Posts. (230mm * 30mm. Mounting holes 25mm apart).
- Four Insulated cables for connecting adjacent End Posts.
- Twentyfour (24) Pingg-String Tree Clips (wire covers).
Pingg-String Design Flexibility
Every installation is different which is why the Pingg-String system can be ordered as components. Order your Pingg-String Energiser plus the number of 15m Extension Kits need.
This End Post Kit is used in a variety of situations. To simplify your ordering, please use this CALCULATOR.
The Pingg-String Fence-Top Barrier System

Installation Sequence
Mini fence barrier demonstration
This illustration is a mini “Fence Barrier” through which we will demonstrate the sequence of installation. It represents just one straight section of your fence. In your actual installation you will repeat this on all protected sides of your property.
Basically, you will screw the End Posts #1 and Support Brackets #2 to your fence. You’ll repeat this on all other straight sections of your fence. Then install the four Pingg-Wires, as illustrated #3, starting from the top wire down. Once every section is completed, they are connected to each other with a pair of insulated cables #7 so all four wires are energised by the pulse.

End Posts
Each straight section of fence will have an End Post at either end. They maintain tension in the four wires. They also connect the wires electrically through the metal discs #4 where the wires are held. Important: End Posts must be fastened to a rigid surface such as timber or metal. You decide whether to fasten these to your fence posts, top rail or the fence. Notice the printed marking “Fence Top”. This is a suggested alignment point to the top of your fence. When aligned to the marker the lower wire will be 1.5cm from the fence top. You can alter this within certain limits. Note: The lowest Pingg-Wire must be no more than 3cm to 4cm above the fence.

Support Bracket
Support Brackets help keep the wires evenly separated and give physical strength to the barrier. The illustration shows one Support Bracket but you’ll install several depending on the distance between the End Posts. Typical spacing is 1.5m but you can install them up to 2.4m if the length of your fence panels dictate this. You can also space them less than 1.5m if you need more physical strength.

Pingg-String Wire
Each set of 4 Pingg-Wires must be installed onto the End Post starting with the top wire and finishing on the bottom wire. This sequence will reduce the chance of over tensioning or having the previous wires go slack. Attach the wire to one end of that section. Walk to the other end while unspooling the Pingg-Wire. Cut the Pingg-Wire allowing enough length to thread through the mounting holes at this end. As you pull the Pingg-Wire through the first hole take up the slack then pull a further 1 or 2 cm to add a little tension to the Pingg-Wire. Do not over tension because it may reduce the life of the wire.

Mounting Holes

Tree Clips & Washers
The Tree Clips are installed to give a neat visual finish to electrical connections. The Tree Clip is a firm fit into the hole. Press firmly! We recommend you attach them immediately after installing each Pingg-Wire .

Bracket Clips
Bracket Clips have a slot through which you can pass the Pingg-Wire. These clips push into the holes in the Support Bracket and keep the four Pingg-Wires apart.

Insulated Cable
Insulated Cable connects the End Post to the next adjacent End Post so the puIse continues in the next section. The insulation has been pre-cut 3.5cm from either end to allow easy removal. When you remove this insulation pull off with a twisting motion. This will keep all the fine wires together and make it easy to attach to the End Post.
Customer Reviews
Easy to install and unobtrusive design.
Adam
-
All Reviews
25 / 25


